Friday, 31 May 2013

Ways to Present My Work


http://www.rainerlagemann.com/Projects/Exhibitions/2010+NaplesNewscom

Surprise for the senses: Contemporary exhibition shows artistic talent as another Florida treasure

 — What a pleasure to realize Florida is not only beautiful but also highly artistic. The second annual “Florida Contemporary 2010” exhibition displays this fact handsomely at the Patty and Jay Baker Naples Museum of Art through next weekend.
The museum is closing for summer a few days early to install the 25-piece Louise Nevelson sculpture sooner than expected later this month. So don’t delay seeing “Florida Contemporary” for a fascinating experience: viewing first-class work by artists one doesn’t know, as well as fine art by a handful of Neapolitans.
Michael Culver, director and chief curator, selected 53 works by 47 artists. “We sent out 500 invitations. No one here was in last year’s show,” he said in the third floor galleries.

Master Street Illusionist Johan Lorbeer


Many artists perform on the street as in our last article on Busking. However, Every once in awhile someone comes along, and takes a familiar medium and expounds upon its possibilities. German performance artist, and master illusionist Johan Lorbeer likes to just hang out, and does he ever. Johan calls this performance "Still Life" but to his credit the only thing still is him. Every one else is a flurry of activity, and astonishment when Johan takes to the streets. Sometimes attracting hundreds of people just to see the spectacle Johan creates with every performance. 


The crowds a buzz with opinons, and ideas at how this could all be possible. Johan Also likes to showcase his "Still Life" presentations in actual Art Gallerys. As a sort of living art statement  that transends physics and gravity. In some ways it gets people talking and dreaming about the possiblities of his illusion.
And this is where I chime in to say Art has never always been about the colors on a canvas or the carefully molded sculptures and textures for me. Art to me is a way to bring people together, and open dialogue, and conversation about life through the multitude of artistic mediums. Clearly, this is what happens when Johan Lorbeer decides to create a spectacle of magic and illusion. And color or no color texture or no texture to me this is Illusion and Art beautifully executed. --- Brovo Mr. Lorbeer


Learn More about Johan's illusions and art by visiting his website.

Thursday, 30 May 2013

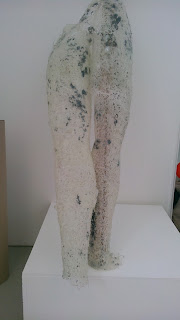
Hot Glue Gun Life Size Legs

Through the photos below it shows you the journey I took making my glue legs.
I used the hot glue gun and many glue sticks produce the following pieces.

After producing the piece of art, I needed to remove it from the mannequin. I began by using the red life and my fingers as they were the tools I could find, but as tutors are very helpful and weary of whats going on around them. An old tutor from a past year was walking through our room and saw me struggling he then went out of his way to get me a chizzle so I wasn't struggling which I was very grateful of.


I firstly used vasaline to cover the whole of the mannequin legs so they were protected when I start glueing them, also makes it easier at a later date to remove the glue from the legs.

These are  the legs so far but as there legs they are much harder to glue and there are many acquired areas to glue and areas which are hard to get to. But so far so good.

This is a step in the journey to the final product, and if i say so myself its not gone too badly as of yet. Also i needed tutors to order me some new glue sticks for me to finish them off.


These are images of the piece finished ready to hang. From here on down,...


The Start of Constructing Our End of Year exhibition

It had arrived time to transform the rooms in to a presentable exhibition space, as a group we had many tasked we needed to achieve.
Such as;
-tidy the rooms
 -begin tie wrapping the table legs together in a covind space
-build boards around the cupboards and tables to create islands.
-after that we needed to sand the boards down
-remove all the mess from current years ( that they have left)
-gumstrip the joining boards together
- drill cabinets, to boards to make sure the stable
-drill pieces of wood on the inside of the joining boards
-make sure we have supplies to plug sockets
- repeat this m any times
-clean sinks and surrounding areas
-cover sinks with plinths and sounding areas with canvas
 
This is a floor plan of how the boards are going to planned out.

We began by emptying and tidying the first room so we could begin building our first island. It was up in no time atall with great help from other students.

We gradually moved down the rooms building the three islands and a  cinema space it took around a week.

Meanwhile whilst the strong boys built the island we began prepping the boards on the first island, we needed to sand them down fill holes in and seal the edges of the boards together  with gum strip and then when all this was done several time we began painting the boards. The image shown above shows the gum strip peeling off, but before we started this I had a discussion with tutors about the gum strip doing this last year and that it was easier to wide masking tape and the paint didn't peel the tape the same, and the paint grabbed to it easily.
KMeanwhil

I got tall people to help me paint the boards as I couldn't reach the top of the boards myself even standing on a chair.


The two places above were talk of maybe being my area, and after planning were everyone was going I was allocated this space to began just touching  up places that people had missed when prepping the boards on mass.


I wore overall so that clothes didn't get covered in paint and also a student had two plinths but didn't need one so I took it off her hands before others got in there before me.


Wednesday, 22 May 2013

Damien Hurst


http://www.damienhirst.com/

Damien Hirst

1965 Born, Bristol, UK
1989 Graduated, Goldsmiths College, London

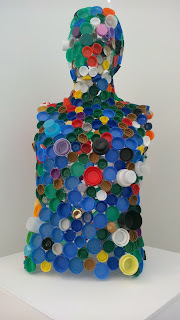
When making my work, I was told that  my work reminded them of Damien Hursts work, so I have looked up his work and its similar but he uses much better materials. But I had to work around that problem as we don't have the money to supply me with dear materials like diamonds and I don't have access to them either. I improvised and went for bottle tops as they are easy access and a new idea to work with.
overview

Damien Hirst was born in 1965 in Bristol and grew up in Leeds. In 1984 he moved to London, where he worked in construction before studying for a BA in Fine Art at Goldsmiths college from 1986 to 1989. He was awarded the Turner Prize in 1995.


Clay Face

Here is a face I made out clay I think it looks effective its made in the same way as my final piece but as the wasn't too sturdy when I took it off the mannequin it broke in to pieces.  I decided to let it try broken fire it and worry about sticking it together later but I am still waiting for it to be fired as the is a lot of work all over the art department which also needs firing. So this out come of the piece before firing it looks really well will just had to wait to see what it turns out like after.


Saturday, 18 May 2013

Tutorial with Jamie and Jo

I had a tutorial with Jo and Jamie, well lets just say it was rather intense. They told me nicely that they weren't so keen on my bottle top body and that it was rather tacky, and that the glue man is work on another level. This is after making theses pieces for many days. I had this tutorial a few days before half term I had a few days left before I had to submit my work. It was really a check over on all my work for some advise on what I needed to cover in the next couple of days before submitting my work. Their advise was to scrap exhibiting the bottle top sculpture and use the glue pieces but I only had one piece so I was sent away with mannequins to made some legs and another body. the only problem was that by the time they had decided this our technician bill had run out of glue sticks! They ordered some more and they were going to arrive the Thursday the week of half term. I attended college to collect them they hadn't arrived so I help for the day to set up the exhibition space instead.
 
They finally arrived the following Tuesday so I had to run to make all this work in just over a week, as the exhibition should/ will be set up and ready for work to be hung and lay out. I had a rush on I had made the legs and only to take the body off.  I completed everything the legs came out really well, but sdaly by rushing and using too much Vaseline to it (so it wouldn't stick to the mannequin)  it totally broke to pieces when taking off the mannequin so that was the end of that piece and we had to adapt around this to plan out  my work. This all wasn't a massive problem and we got on with it. My exhibition space was done which gave me time to finish off other work.


Wednesday, 8 May 2013

Bottle Top Final Piece

Below shows with images the stages in that I made my bottle top body, it took a long time but the end result it worth it. Others don't like it as it looks tacky and not as intricate as the glue, but it was all an experiment and I wouldn't of found out these things without trying it. I think I may have looked good with some lighting inside against a white background to reflect a good shadow. When deciding what I should exhibit tutors talked very strongly of not using the bottle top man and just the glue pieces as the bottle top body brings down the quality of the others. I took this advise as although pieces wont be exhibited they will be viewed by the examiner and as he s marking my work I found that as a honour for him personally viewing my work.


I have some extra bottle tops left and just time to extend the bottle top man future, on to the bottom and top of the legs. Due to the mannequins being separate ( the body and the legs) it made it hard to begin it so I decided to made then separatly then join them together off the mannequin with more bottle tops. As I went to sit the bottom part ( shown below) on top of the bottle top body it was a smaller size and I couldn't stretch it. So after that idea I couldn't join them after all. In a way I was glad this happened as after making it all and trying it out I found it would be going over the top and it looked fine how it was.